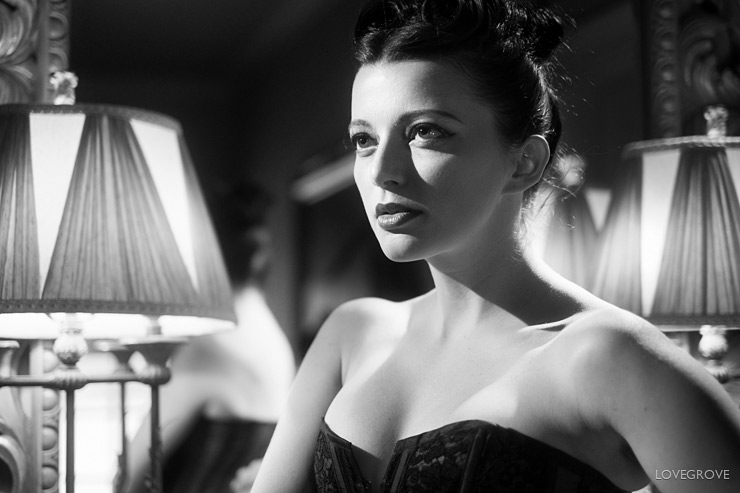
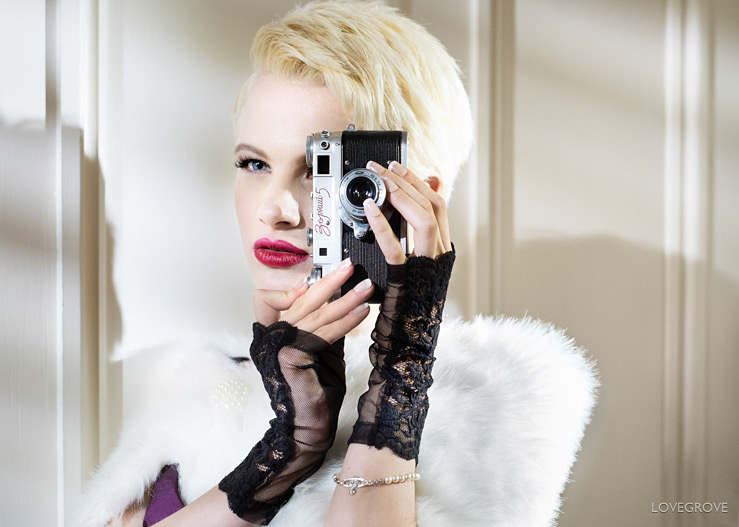
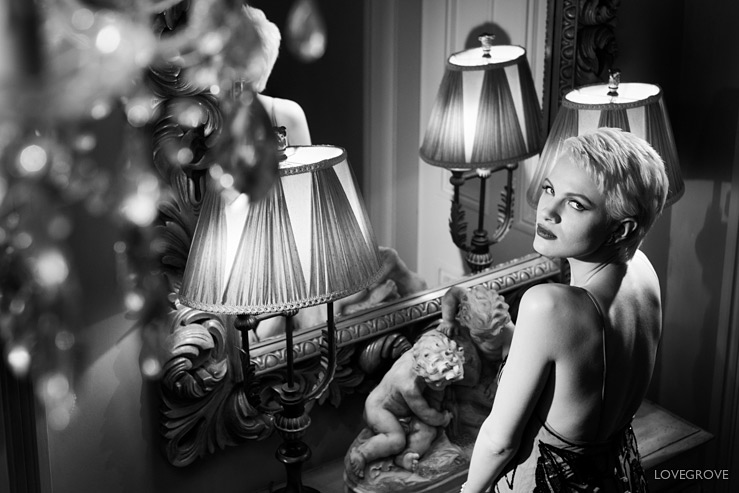
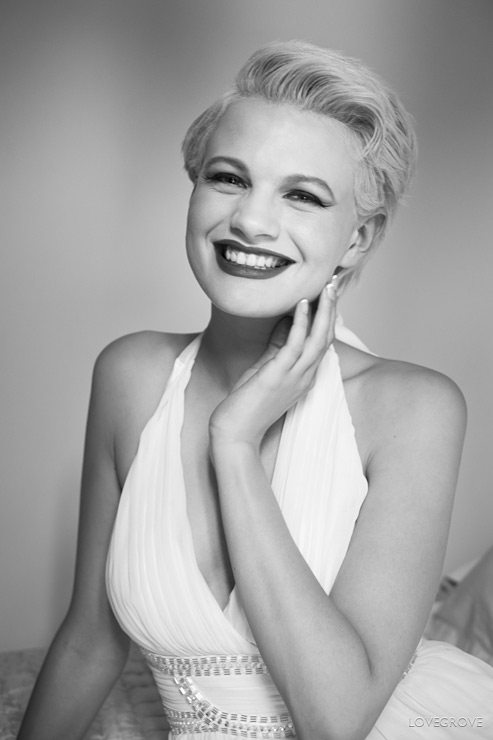
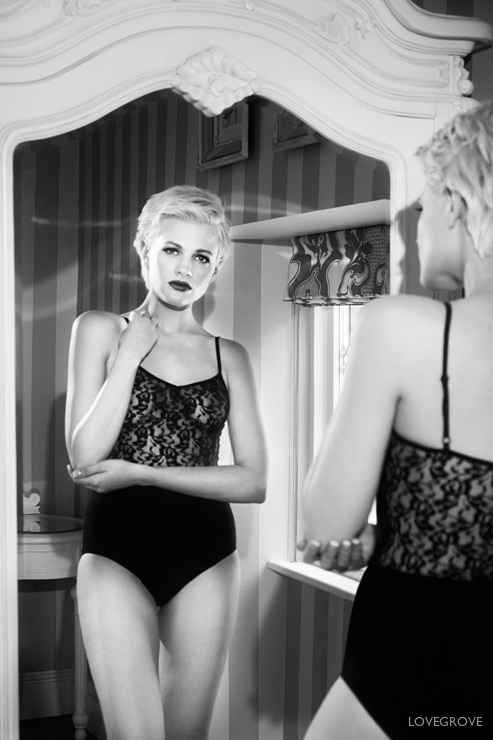
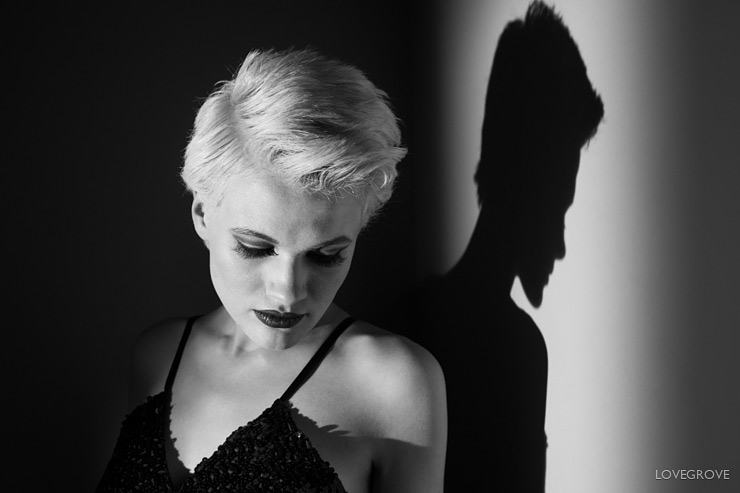
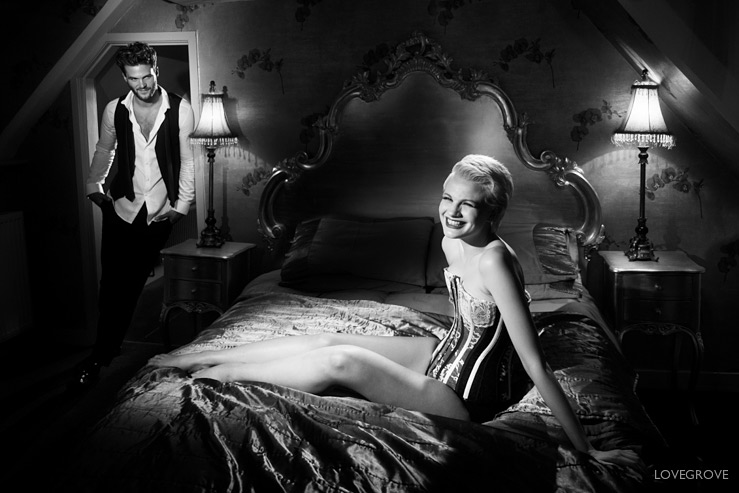
01. Helen Diaz looking every bit the Hollywood siren. Notice the cheek triangle of light. This occurs when the nose shadow touches the cheek shadow to enclose a triangle of light. This isn’t Rembrandt lighting. Rembrandt used a softer light source and kept the nose shadow distinct. See some examples of Rembrandt lighting here. The trick for the Hollywood look is to always shoot into the unlit side of the face unlike Rembrandt. Fujifilm X-Pro1, 35mm lens at f/1.4 for 1/125th of a second with ISO 640. The 35mm Fuji lens is super sharp where it matters wide open and is beautifully smooth in the out of focus or bokeh areas. It is an optical masterpiece.
Here is the result of my summer project. My quest to revitalise the Hollywood look started exactly 5 years ago today back in 2008 with this very popular Prophotonut post. Now I’m glad to say that everyone is at it and the Hollywood look has finally been reborn.
The look needs Fresnel lens lights for authenticity. But wow, what style! Five years ago LED Fresnel spotlights weren’t even dreamed of. Now they have largely replaced the fairly recently developed HMI units from Lupo and Hedler. LED is the future and it’s here right now.
Here are 40 of the many Hollywood portraits from my latest sets complete with their exif data, and lighting notes. Enjoy…
Model: Helen Diaz
Make Up Artist: Claudia Lucia Spoto
Styling: Lisa Keating and Damien Lovegrove
Shot on location at Pipewell Hall
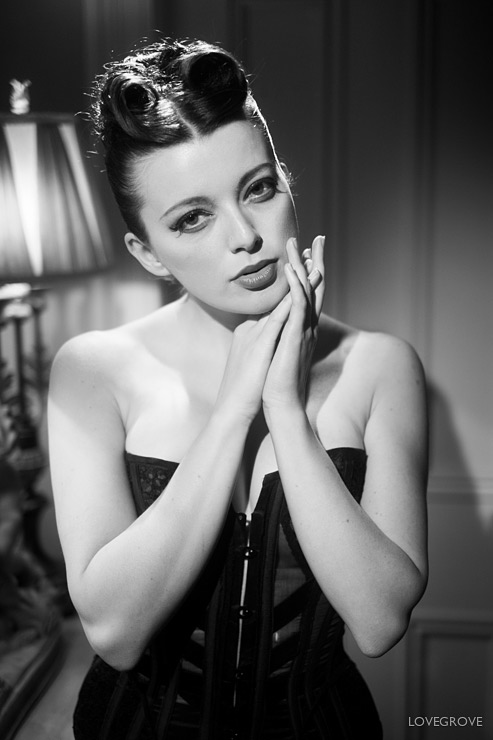
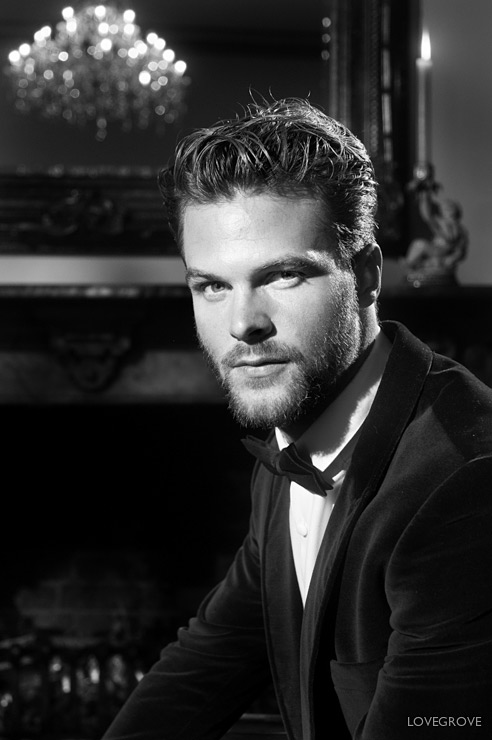
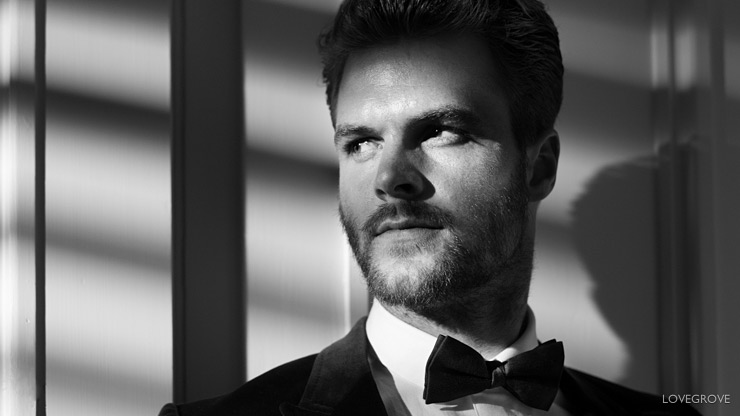
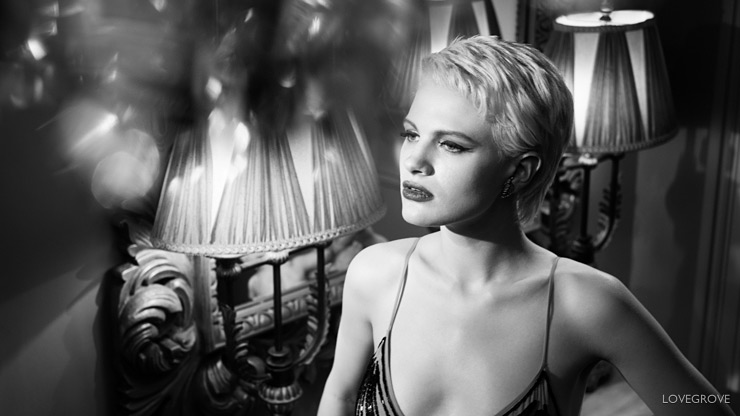
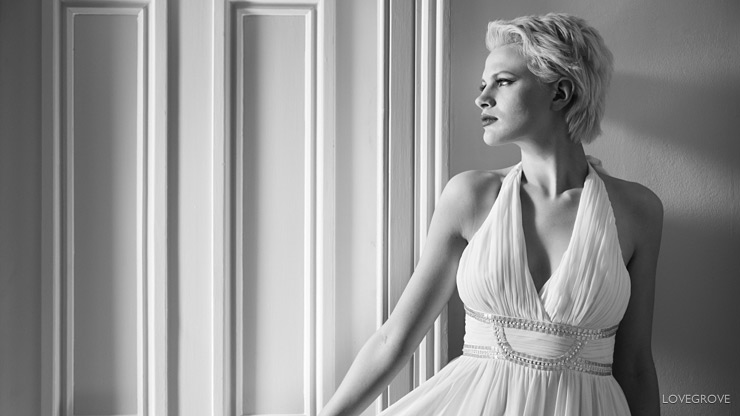
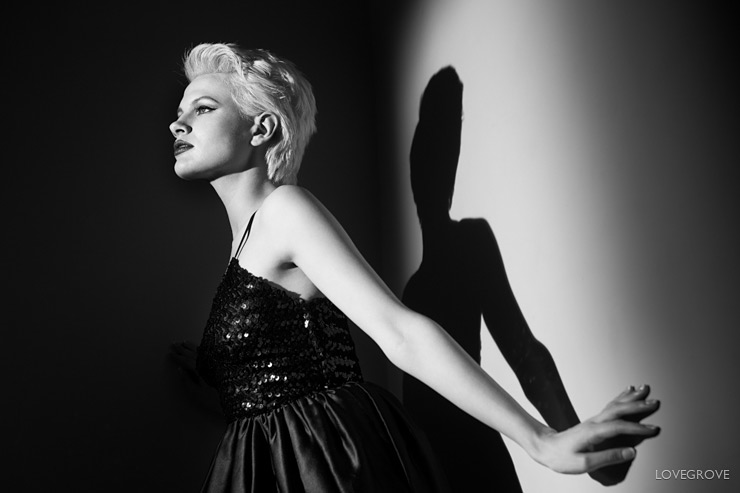
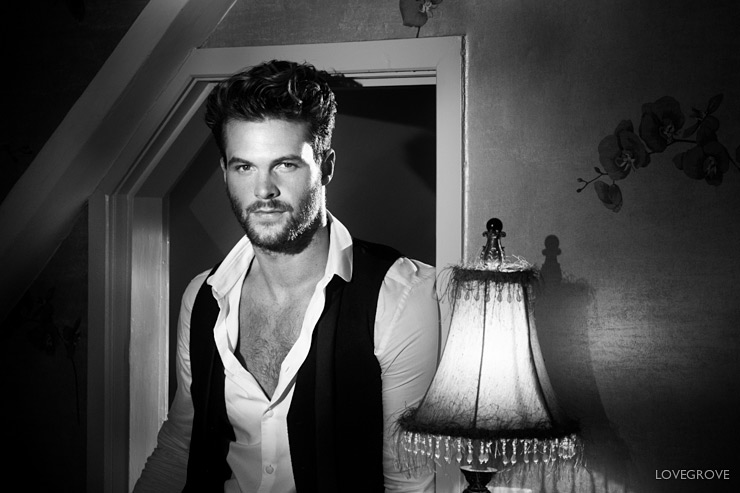
02. This has to be one of my favourite portraits of 2013. Notice how hard light narrows Helen’s face. It falls away around the sides giving a more slender look. Soft light by comparison widens faces and flattens texture. The rim lighting for this shot and the one above comes from a Lowel iD light on a Lovegrove boom arm. The boom allows me to place the stand out of the shot to the right of frame. Fujifilm X-Pro1 35mm lens at f/1.4 for 1/125th second with ISO 640. The key light is the wonderful Arri 300 Fresnel light. Corset as above by Lisa Keating.
These first few pictures of Helen were shot at my 2013 Hollywood Portraits workshop. I used several light types and essentially shared my heart and soul with my clients. Workshops like this bring together delegates from around the world and have a special buzz that’s hard to put a finger on. We all know something amazing is happening and it’s easy to get immersed it the subtleties of light positioning and camera angles. Another point of note is the catering supplied by Trudie Baker at Pipewell was fabulous.
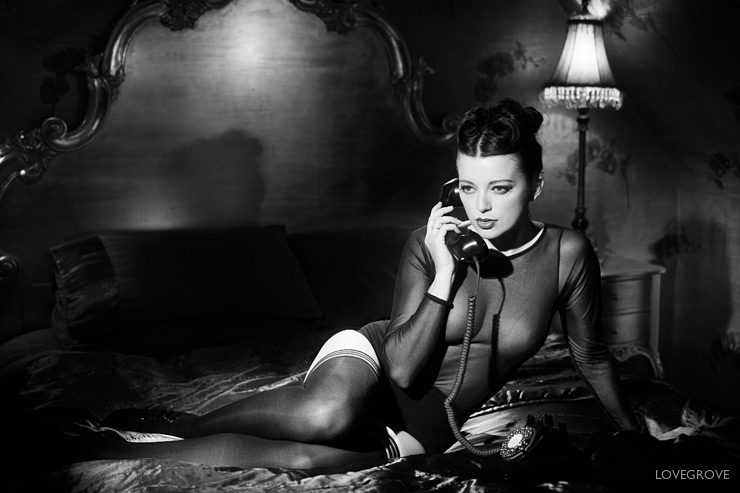
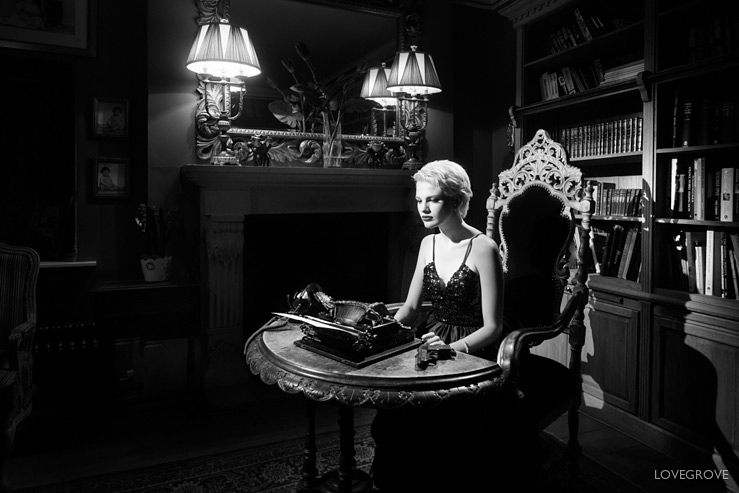
03. Helen is once again lit with that classic two light tungsten set up of the Arri 300 key and the Lowel iD backlight on the boom arm. The bedside light gives the motivation for the back light and sets the base exposure. The vintage telephone came from Ebay. Claudia created Helen’s look with classic hair curls and well defined eyes. Fujifilm X-Pro1 camera with the 35mm lens at f/2. 1/125th second using ISO 640.
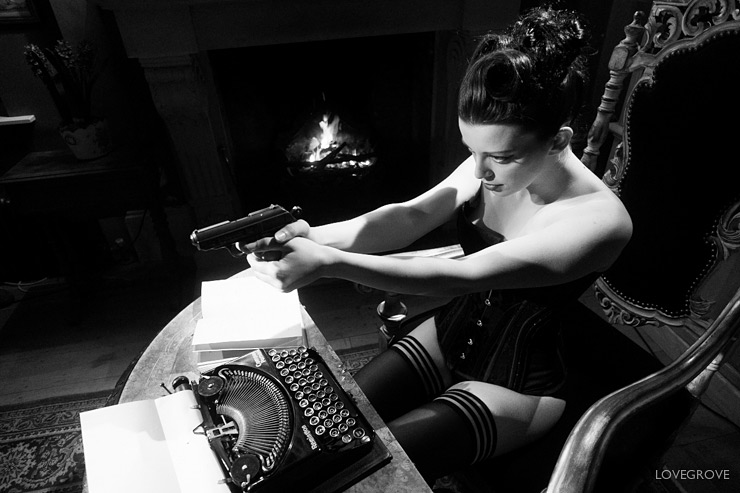
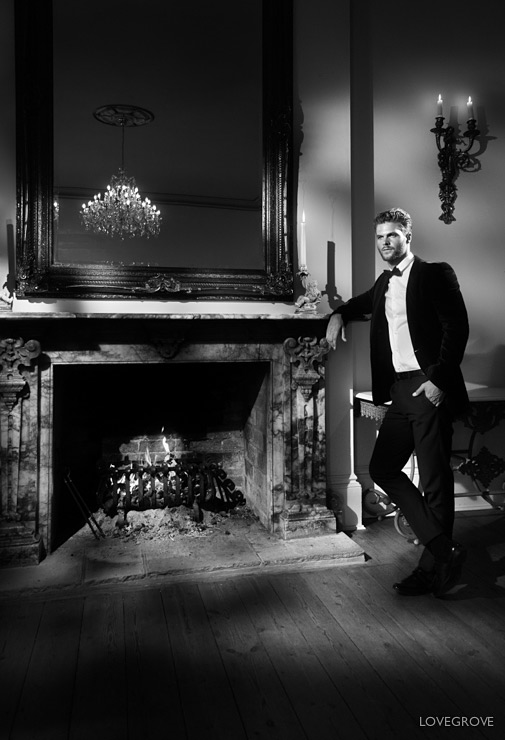
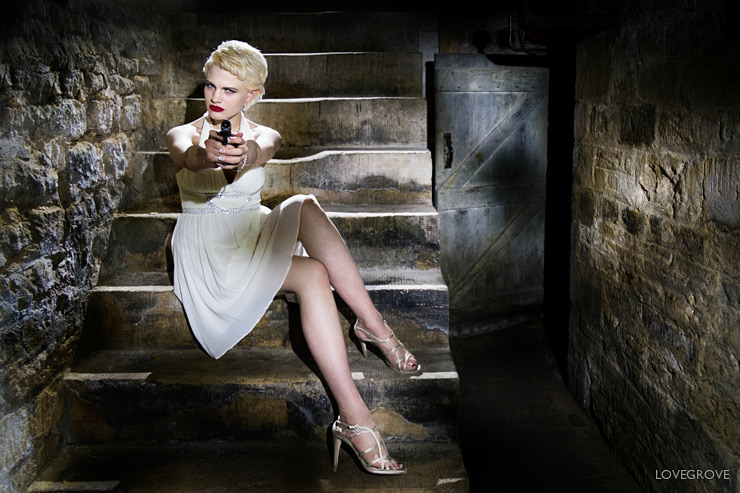
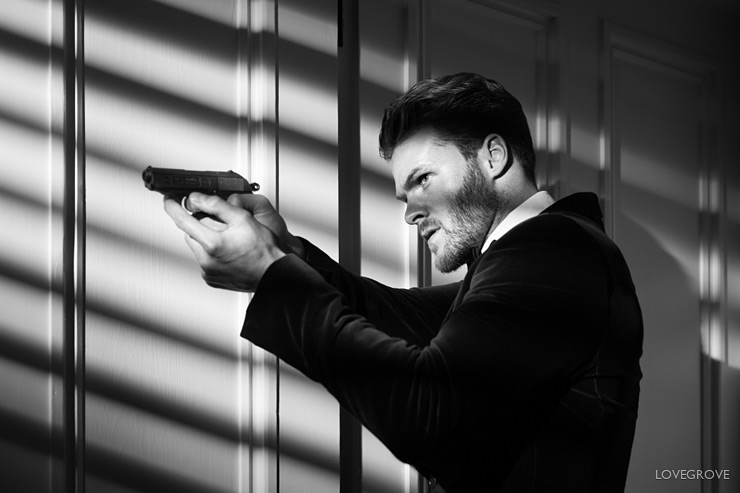
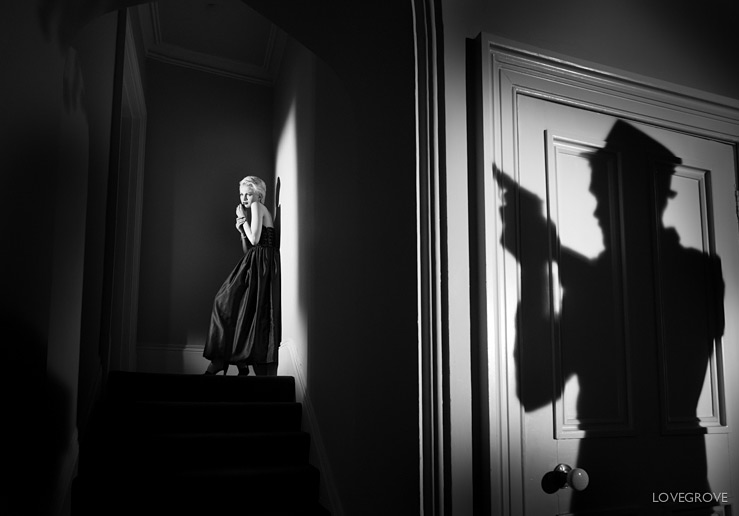
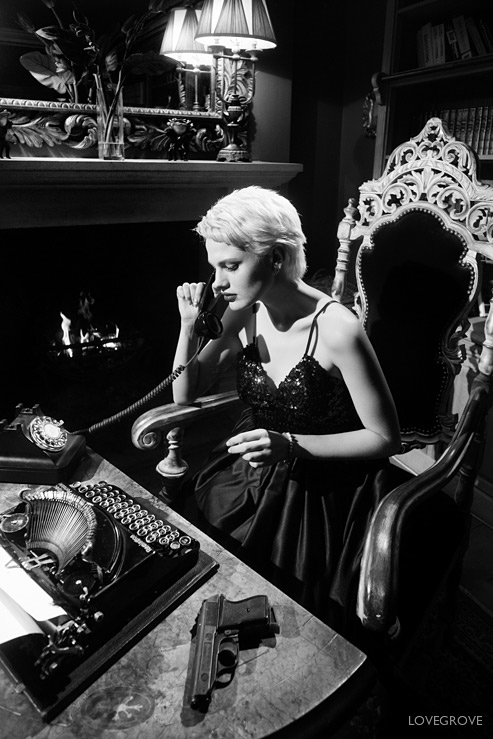
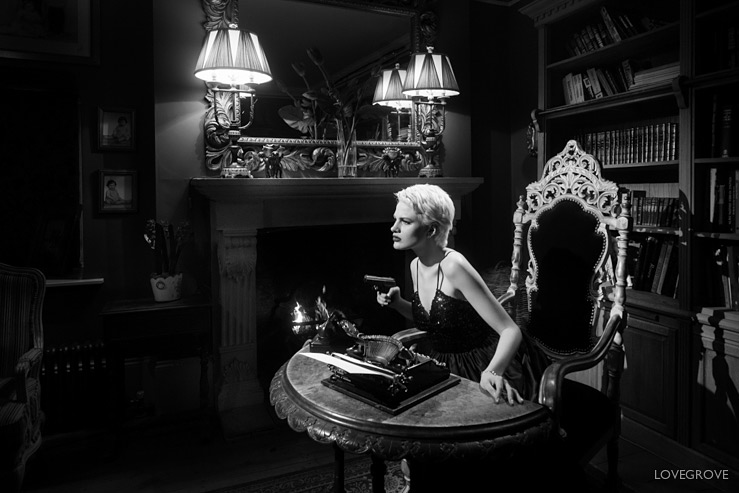
04. The gun is a Walther PPK (ex Italian police issue) Don’t ask me where it came from. The typewriter is a 1932 Remington that I bought on Ebay. This day for night scene was lit with the same Arri/ Lowel combination as the previous two pictures. It’s not often I shoot portraits with a wide lens but here I used the 14mm Fuji prime lens at f/2.8. 1/60th second at ISO 1250 to expose for the fire. My lights were dimmed accordingly. Corset by Lisa Keating.
This next set of pictures were shot a few days after the workshop with Helen above. I produced a movie of the shoot. It’s more than just a behind the scenes production. It is a fully featured how to video brimming with useful lighting tips and knowledge. I reveal my strategies and secrets of lighting as each chapter unfolds. I leave no stone unturned and I share everything I know. There are 17 chapters that run for 1 hour 45 minutes in total covering more set ups than are shown here. View the free 17 minute trailer here to get an idea of the production as a whole.
Models: Chloe-Jasmine Whichello and Jamie Roche
Make Up Artist: Claudia Lucia Spoto
Styling: Lisa Keating and Damien Lovegrove
Shot on location at Pipewell Hall
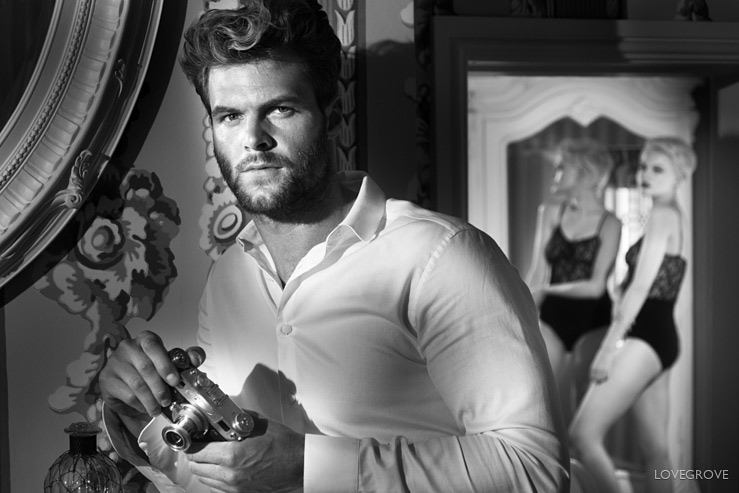
05. Fujifilm X-Pro1 18-55mm zoom lens at 18mm. 1/60th second at f/2.8 using ISO 800. I used my camera on a monopod for this shot of Jamie in the dining room. I have the RRS ball head on my Gitzo monopod and I use the RRS camera ‘L’ plate on my X-Pro1. The light was created with a Lupolux 1000 LED Fresnel spotlight using a ‘Crunch’ Scattergel™ as a key and a Lupolux LED 650 as a kick light/ back light. You can watch me make this portrait in the free trailer.
06. Jamie looking rather suave. I used a 3 light set up using a key, a background light and a kick light. We had a shortage of kindling for the fireplace. Fujifilm X-Pro1 18-55mm lens at 39mm. ISO 800, f/3.6 at 1/60th second.
07. This high key shot of Chloe-Jasmine was lit with two Lupolux LED lights. I adore broken light and used a Scattergel and a home made Venetian blind fixture to create this look. Fujifilm X-Pro1 35mm lens at f/2.5, 1/125th second at ISO 800
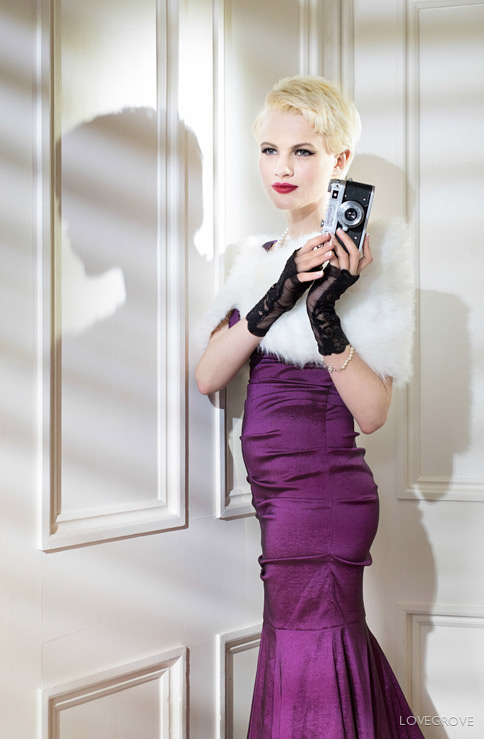
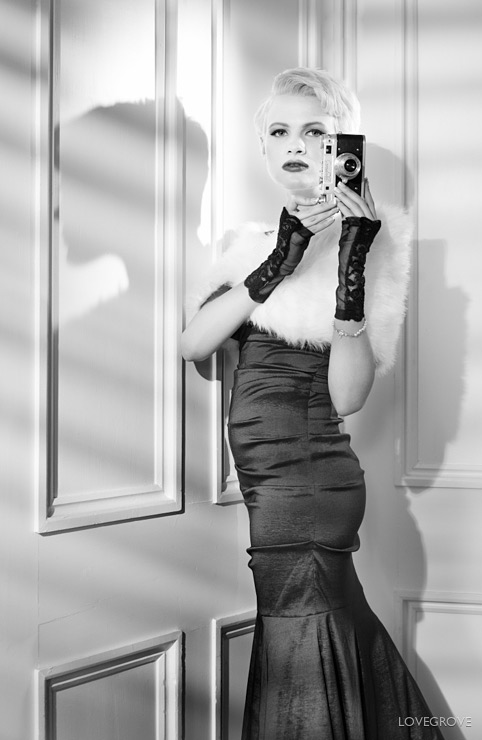
08. I shot the whole movie with my X-Pro1 set to monochrome but as I have the RAW files I’ve brought a few frames back to colour. Fujifilm X-Pro1 35mm lens at f/2.5, 1/125th second at ISO 800
09.This Russian market Zorki 5 was a really cool find on Ebay. Fujifilm X-Pro1 35mm lens at f/2.5, 1/125th second at ISO 800
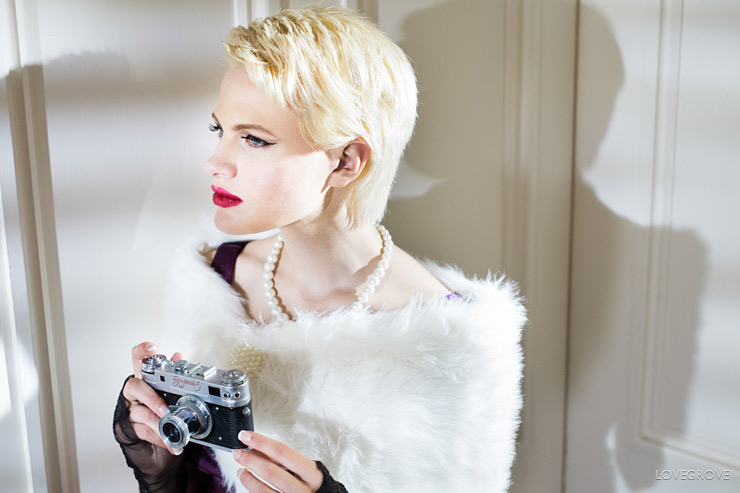
10. The retractable lens on the Zorki reminds me of the retractable Sonnar lens on my Rollei 35s. I used the a high vantage point and a negative composition to add tension. Fujifilm X-Pro1 35mm lens at f/2.5, 1/125th second at ISO 800
11. In the cellar with Chloe-Jasmine and a pair of Lupolux LED lights. I set the two lights and connected them to inverters as there is no mains power in the cellar at Pipewell. Fujifilm 18-55mm zoom set to 18mm at f/2.8. ISO 800 for 1/60th second. We had fun shooting in the cellar with three video camera operators shooting on Canon 5D mk2s, a production director and a sound recordist.
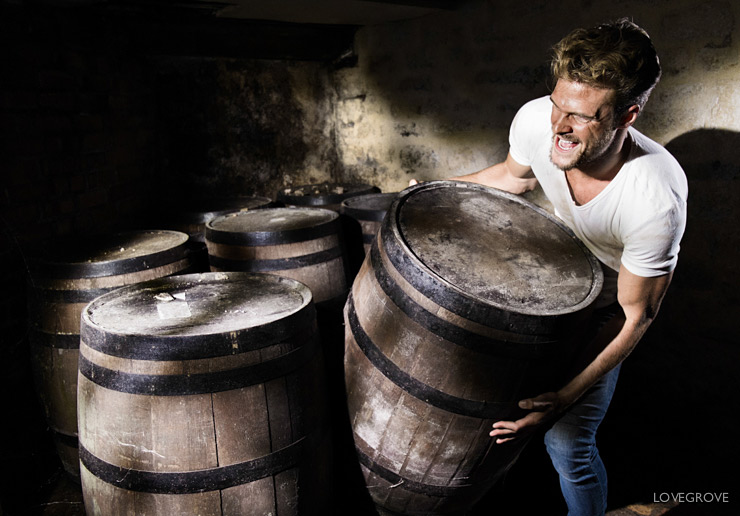
12. Jamie getting stuck in to shifting the barrels. I lit Jamie with two lights, a Lupolux 1000 and Scattergel™ as a key light and a Lupolux 650 as a kick light. These Lupolux LED lights are a perfect shooting kit. ISO 1250, 18-55mm lens at 18mm setting f/2.8 for 1/125th second.
13. A low key shot of Jamie with the pistol in exactly the same spot as I shot Chloe-Jasmine high key earlier. In the video I explain and show how to establish shadow depth, set the image contrast and add punch to the portraits. Fujifilm X-Pro1 with 35mm lens at f/2.5 for 1/125th second with ISO 800
14. Jamie in the same spot as the shot above. Shooting with the camera set to manual exposure gives a consistent look throughout a set of pictures. Fujifilm X-Pro1 with 35mm lens at f/2.5 for 1/125th second with ISO 800
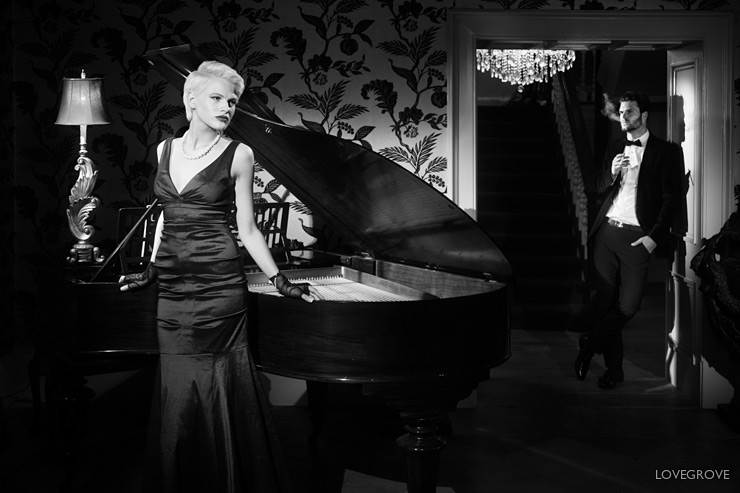
15. This classic movie scene uses 7 lights including the Chandelier and the table lamp. It is the most complicated rig on the video but it’s all quite straightforward when I explain and rig each light in turn. Fujifilm X-Pro1 with 18-55mm lens at 27mm setting. f/3.2 ISO 800 at 1/30th second.
16. This shot was taken a moment after the one above. This zoom range is perfect for interior portraits. Fujifilm X-Pro1 with 18-55mm lens at the 55mm setting. f/4.0 ISO 800 and 1/30th second. I was very surprised with the ‘kit’ zoom lens performance when I first tried it. I was thinking that f/4 at the 55mm end was going to be disappointing for background bokeh. I was wrong. It’s another optical masterpiece with a creamy unfussy out of focus character.
17. Fuji X-Pro1 35mm lens at f/2.8. ISO 800, 1/125th second. I shot through the chandelier holding the camera above my head. Something that’s not easy to do with an SLR. The LCD display on the Fuji is just perfect in such situations. I lit this frame with the Arri 300 and Lowel iD light combination.
18. Set up as above. Fuji X-Pro1 35mm lens at f/2.8. ISO 800, 1/125th second.
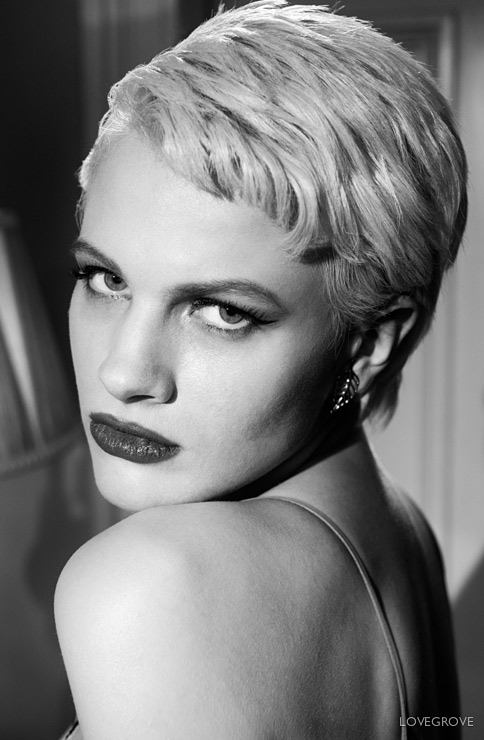
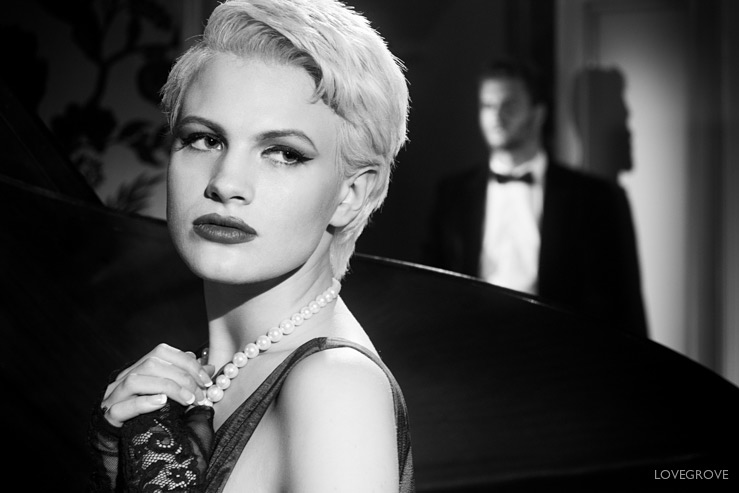
19. Chloe-Jasmine looks amazing in this scene. I love the subtle twist in her hair and the delicate make up. Fuji X-Pro1 35mm lens at f/3.6. ISO 800, 1/125th second. Fabulous beauty lighting and wonderful optical quality at work.
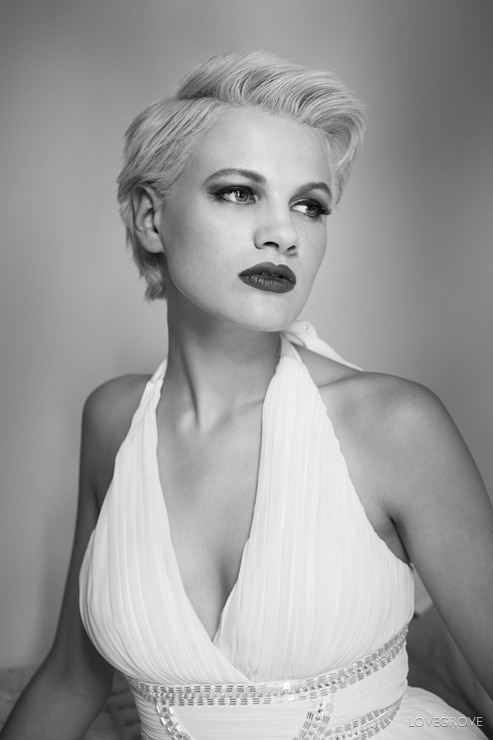
20. This all together far flatter image was not lit with available light. There was far more control available than you might think. On the video I demonstrate how to take control of the light in a room. Fujifilm X-Pro1, 35mm lens at f/2.8 for 1/60th at ISO 800
21. Chloe-Jasmine looks amazing here. All settings are the same as in the picture above. I love the tonality of softly lit high key images. It’s so easy to be drawn to these and that’s why so many soft boxes are sold each year. After a while I crave the clarity of hard light though. Compare how narrow and defined Chloe-Jasmine’s face looks in shot 19 and how flattening this lighting is here. The skin texture is far more alive in shot 19 too in my opinion. That’s the beauty of hard light.
22. Carefully controlled window light was all I needed for this simple shot of Chloe-Jasmine. Fujifilm X-Pro1, 35mm lens at 1/60th second using ISO 800
23. This next sequence was lit with a Lupolux 1000 with a Scattergel™ fitted. Fujifilm X-Pro1 with the 18-55mm zoom lens at 55mm. 1/60th at f/4 using ISO 800. Those photographers that know me will understand why these exposure settings have been the most widely used in my career.

24. Info as above.
25. Info as above
26. I used one Lupolux 1000 to key and kick Chloe-Jasmine. Fujifilm X-Pro1, 18-55mm zoom at 39mm, ISO 800, 1/60th second at f/4
27. A second Lupolux 1000 with a scattergel™ was added to the set up above to light Jamie. Fujifilm X-Pro1, 18-55mm zoom at 46.3mm, ISO 800, 1/60th second at f/4
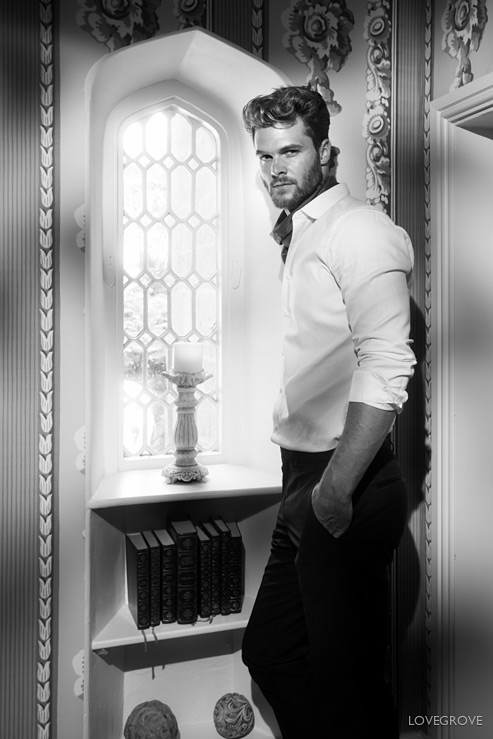
28. I panned the light around to light Jamie at the window. One light, hard light shooting is so easy and so rewarding. Put a soft box here instead and the shot would be flat and boring by comparison. Fujifilm X-Pro1 18-55mm lens at 22.3mm, f/5 at 1/60th, ISO 800
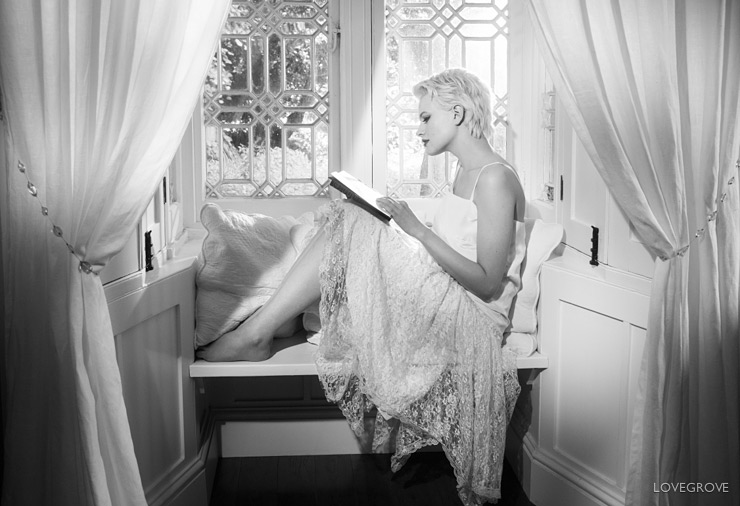
29. I then panned the light to the window to light Chloe-Jasmine and I added a second light outside the window shining back in as Chloe-Jasmine read to us :) Fujifilm X-Pro1 18-55mm lens at 23.3mm, f/5 at 1/60th, ISO 800
30. Fujifilm X-Pro1 with the wonderful 14mm prime lens at f/4, 1/60th second ISO 800. Jamie was in the shadow of a Lupolux 1000 on full spot and Chloe-Jasmine was lit with a Lupolux 650. It’s that magic combination again.
31. I swapped to the 35mm lens and set 1/60th at f/2.8 ISO 800 for the close ups.
32. Lighting as above. Just look at the divine shadow. Simply wonderful.
33. Magic.
34. Fujifilm X-Pro1 18mm, f/2.8 at 1/60th, ISO 800. This simple 4 light rig plus the bed side lights will be a doddle to set up when you’ve seen the video. This lighting set up would look just as fabulous in a modern hotel or any bedroom with an en-suite bathroom. Just shut the curtains and you have an evening set up. Corset by Lisa Keating.
35. Fujifilm X-Pro1 18-55mm lens at 55mm setting. f/4 at 1/60th ISO 1250. The exposure was set by the lamp and my lights were adjusted to match. Low wattage bulbs are just so dim at times it’s worth having some tungsten bulbs in various fittings to hand if you shoot on location regularly.
36. ISO 800, 1/60th at f/4 with the 14mm lens on my Fujifilm X-Pro1. I lit these final frames with the Arri 300 and the Lowel iD light combination that I used earlier. Rigging the lights, setting the barn doors, adjusting the flood and spot and dimming to taste is the process I use to create my looks.
37. The 14mm lens puts the emphasis on the gun.

38. It’s trouble on the phone and he’s coming to get Chloe-Jasmine…
39. But it’s okay because Chloe-Jasmine is ready for him.
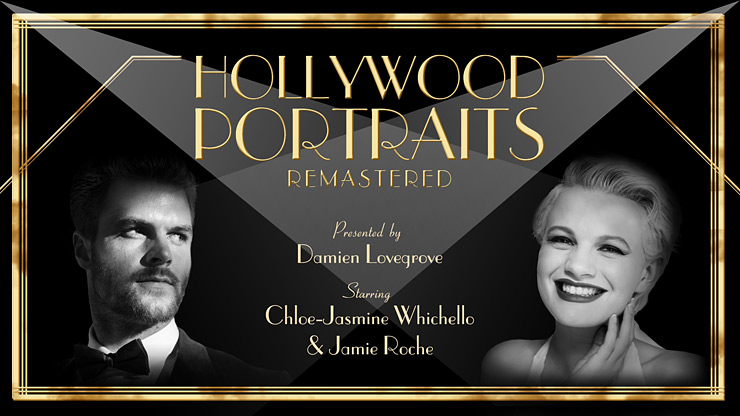
40. This is the title graphic created by Luke Knight our in house graphics expert. He animated it in Final Cut Pro and the animation is on the front of the trailer. Click on the picture to see the free 17 minute full HD trailer for the Hollywood Portraits Remastered production.
Do you prefer the ‘high key’ look of portraits 20 and 21 or the ‘low key’ look of portraits 1 and 2?
Do you have a few questions? Please view the trailer and feel free to comment below :)
A very nice series of noir scenes, with excellent lighting and mood.
Reminds me of 1940s movies and Nouvelle Vague.
I also work a lot with continuos light like Arri etc., especially when creating cinematic, narrative series.
Regards
Frank
Hi Frank,
Thanks for the compliments. Continuous lighting is the way to go for this kind of work.
Kind regards,
Damien.
Incredible wide angle portraits!
Thank you Eva,
It’s the wide angle imagery that tells the story.
Kind regards,
Damien.
Thank you Damien
I purchased the X-E1 a couple of weeks ago with the 35mm lens,,, also i am waiting for the 18mm to arrive ( part of the deal from fuji when purchasing the camera and lens).
The X-E1 is a great camera, used in anger a couple of times now in the studio with arri,s on Boudoir shoots.
I may well sell the 18mm and get the 18-55mm. Would the f4 be fast enough though ?
By the way see you in November for your Concept 2 Print seminar in Staffs
Thanks
Mark
Hi Mark,
Exciting times ahead. I chose to sell my 18mm as the zoom seemed a tad sharper in the corners as well as crispier in the middle of the shot than the pancake prime. The zoom is far bigger though and if size matters you’ll stick with the 18mm. By the way the 18mm-55mm zoom is f/2.8 at 18mm focal length plus it has stabilisation. This OIS really is a deal breaker for me because I can use the lens at 1/60th and not suffer camera shake. At the 55mm focal length I’d usually need 1/250th second hand held to nail a shot for sharpness. The zoom gives me scope to use 1/125th and lower if required.
I look forward to seeing you in Staffs.
Kind regards,
Damien.
Beautiful images as always Damien. Love the B&W conversion!
Thanks Sean. I used the button labelled ‘Black and White’ in Lightroom 5. No other tweaks to the mix.
Kind regards, Damien.
Damien,,, great work as usual.
I have the x100 and have started using it more in the studio , although the 23mm lens is a bit wide sometimes.
I am debating over the X-Pro1 and in dilemma as to which lens to purchase,, bearing in mind i have the 23mm on the x100.
Would you suggest the 18-55 kit lens ( not sure about the variable aperture) or maybe the 35mm or 60mm?
Thank You
Hi Mark,
These are great questions. I started with and X100 and the 18, 35, 60 lenses on my X-Pro1. I sold the 18 and bought the 18mm-55mm zoom. The zoom is perfect for most shots. Get an X-E1 with zoom kit or wait a week to see what new X cameras Fuji are announcing. Bear in mind that the optical viewfinder on the interchangeable X cameras is not great so the X-E would be my camera of choice.
Best regards,
Damien.
Damien: Love your work. I found your site through Fujixseries forum. I wanted the X100 since I saw your initial post. Great series of shots. I must say that though I really like the two first low key shots, I literally stopped on image 20. Love Love Love that shot (and 21). So beautiful. So Soft and Lovely!
I just bought the Fuji X100s, which I have been really enjoying. Great for walk a bouts and kids. I don’t think my wife would allow me to do much Boudoir photography so I will enjoy your work. :-)
Cheers,
Mark (MSM @ Fuji x series forum)
Hi Mark,
Thanks for the compliments about my pictures. I’ve put up a new gallery of my X100 pictures and I’ll be adding others taken with each of the X-Pro lenses too. Stay inspired and keep popping back.
Kind regards, Damien.
I came upon your site by chance and really glad I did. I have not done any real photo work in many years (due to some blunt eye trauma) and had decided to get back into some casual photography and thus, just got a Fuji X-1. I found your site and images inspiring.
Though I prefer film to digital, given my situation the advantages of digital really do work for me and your images show that measure of what can be done that is reminiscent of the finer days of film based portraiture and homage to Hollywood (George Hurrell etc.).
Again thanks much for sharing and in a way a really good motivator.
Thanks for your kind words Phrehdd,
Stay inspired, Damien.
Hello Damien,
I finally watched the Hollywood Portraits Remastered Videos today. Like I said, I’m coming back with further questions and a few things I noticed:
– Regarding the size of the lamp/bulb/LED panel
Since you lit most of the interior shots with the Lupolux I wonder how important the diameter of the light-source (having to be a pointlight) really is. You wrote in your previous answer that the filament in an Arri 300 is 10mm and that a modeling light of a flash/or the flash bulb. But as far as I can see in the following picture the LED-Panel of the Lupolux is even bigger than the diameter of a flash-bulb.
http://2.bp.blogspot.com/-fnb-uNvxh6c/ULDP1tlhhCI/AAAAAAAAAyY/hhHsLk6mPG8/s1600/led001.jpg
So I wonder how crucial the size of the bulb is to get the Hollywood Portrait/Film Noir Look with a Fresnel-Lightmodifier.
– Regarding the power/color of the light/practical light
You are right, that conventional bulbs in the practical lamps are more orange in color compared to flash, but as you say yourself in the videos, this isn’t really a problem with black and white and could be corrected through a cto gel with flash if I want to have a color picture. The Lupolux you use are daylight balanced as well, aren’t they?. If i’m not wrong, all the pictures with practical light in your post above are black and white and all of the color pictures have the Lupolux as the only lightsource and no practical light.
The modeling light in a flash is orange anyway. So if I use the 250 Watt modeling might of my flash for lighting (not using flash at all) I wouldn’t have a color problem. And the conventional bulbs will be gone soon anyway, since the EU banned them in favor of energy saving bulbs, which are not getting as hot as conventional bulbs. So one could use energy saving bulbs with higher watts compared to conventional bulbs and raise the level of the practical light, without burning the lampshades as you mentioned. Energysaving lamps have 5 times the light level of conventional lamps, but only produce half the heat.
So I don’t understand, why you say that the 2 first pictures in your above post are impossible to light with flash. Your assumption is, that the light level difference between flash and practical light is to high, but with what I decribed above + a flash that can be dialed down to about 50, 20 or even 10 Watt the light level could be just fine.
I agree with you, that constant light gives me easier possibilities when on location (like in your videos going into an old mansion and probably not having the possibilities to change bulbs for example), but I can not see why it isn’t possible to do these kind of pictures in a more controled environment like in a studio with flash. For example as a portrait or fashion shoot.
I also agree, that with constant light what you see is what you get, but I think that refers only to the light intensity. The shape of the light through the barn doors for example can be observed with the modeling light as easily as with constant light. I haven’t noticed the shape of light to change, when working with flash.
I really love to read your thoughts on these points.
What I missed from a title that says “Hollywood Portraits Remastered” is a bit of an introduction/description, what defines a Hollywood Portrait-Look. Something like hard light sources, deep shadows, no or minimal fill. The main light sources being the key and the backlight. Styling of the 40s and 50s, Makeup etc.
Nevertheless I enjoyed watching the videos and the information you give about how to position the lights and how to invoke emotion, atmosphere and texture with them. The results are spectacular like all of your images.
Cheers
Mirko
Hi Mirko
My answers are in bold below your questions / notes:
[- Regarding the size of the lamp/bulb/LED panel
Since you lit most of the interior shots with the Lupolux I wonder how important the diameter of the light-source (having to be a pointlight) really is. You wrote in your previous answer that the filament in an Arri 300 is 10mm and that a modeling light of a flash/or the flash bulb. But as far as I can see in the following picture the LED-Panel of the Lupolux is even bigger than the diameter of a flash-bulb.]>
I lit some of my pictures with the Lupolux and as you will have seen I lit a lot of shots with the Arris, Dedos, and Lowel iD lights. But it’s not just the size of the source, My Elinchroms have a doughnut shape flash tube and when it is focussed using a lens it gives a similar pattern of light with a hole in the middle. The LEDs aren’t ideal in that they are a rounded square and when spotted up they produce a squareish spot of light. I rarely use them spotted though so in full flood mode that really doesn’t matter.
[So I wonder how crucial the size of the bulb is to get the Hollywood Portrait/Film Noir Look with a Fresnel-Lightmodifier.]
Give it a try and find out for yourself. There are many to try on the market. The best I used was the Bron Mobil because it had a 20mm aperture and frosted glass. This cut out 80% of the light but as I wanted to work with shallow depth of field it was a godsend. The Mobil fresnel adapter comes up on Ebay for about £150 from time to time.
[Regarding the power/color of the light/practical light
You are right, that conventional bulbs in the practical lamps are more orange in color compared to flash, but as you say yourself in the videos, this isn’t really a problem with black and white and could be corrected through a cto gel with flash if I want to have a color picture]
Adding CTO to flash is not easy unless it has barn doors on the Fresnel but it is possible and that is what I do with my Speedlights on location.
[The Lupolux you use are daylight balanced as well, aren’t they?. If i’m not wrong, all the pictures with practical light in your post above are black and white and all of the color pictures have the Lupolux as the only lightsource and no practical light.]
After chapter 1 on the film you will have seen I was using the tungsten balanced fresnels and the Lowell 100w light as the Lupos are the wrong colour balance and more powerful or bigger units than are needed. The great thing about the Lupos is that they have dedicated spring clips built in to the barn doors to attach CTO gels so there is no faffing around with clips etc.
[The modeling light in a flash is orange anyway. So if I use the 250 Watt modeling might of my flash for lighting (not using flash at all) I wouldn’t have a color problem. And the conventional bulbs will be gone soon anyway, since the EU banned them in favor of energy saving bulbs, which are not getting as hot as conventional bulbs. So one could use energy saving bulbs with higher watts compared to conventional bulbs and raise the level of the practical light, without burning the lampshades as you mentioned. Energysaving lamps have 5 times the light level of conventional lamps, but only produce half the heat.]
Energy saving bulbs are poor colour renderers in general and because of their shape they do not lend themselves to be put inside focussing spotlights.
[So I don’t understand, why you say that the 2 first pictures in your above post are impossible to light with flash. Your assumption is, that the light level difference between flash and practical light is to high, but with what I decribed above + a flash that can be dialed down to about 50, 20 or even 10 Watt the light level could be just fine.]
Great – Just do it. I can’t do it and make beautiful pictures but that doesn’t mean to say you can’t. Have a go, don’t take my word for it. Consider it a challenge. That is what I do all the time. I try out new things that ‘shouldn’t work’ and make them work. That’s why I developed the Gemini flash bracket, the Scattergel, the Lovecube, and the magic water reflector etc. These were all to create lighting effects that were not available off the shelf.
[I agree with you, that constant light gives me easier possibilities when on location (like in your videos going into an old mansion and probably not having the possibilities to change bulbs for example), but I can not see why it isn’t possible to do these kind of pictures in a more controled environment like in a studio with flash. For example as a portrait or fashion shoot.]
Again I say give it a go. It’s not impossible, I’m just saying that in my experience continuous is easier and looks fantastic. It’s possible to shoot a wedding on an iPhone but it is easier on a camera with a bit more control. The pictures are better too :)
[I also agree, that with constant light what you see is what you get, but I think that refers only to the light intensity. The shape of the light through the barn doors for example can be observed with the modeling light as easily as with constant light. I haven’t noticed the shape of light to change, when working with flash.]
It’s the subtleties of shadow transition that matter most. It’s called the penumbra and this to lighting is like bokeh to optics. Take a look at a real commercial fashion shoot where I use Flash and Lupos in harmony. Both light systems are selected to do jobs where they perform the best. I’ve put extensive lighting notes in this post too:) https://www.prophotonut.com/2011/10/01/kosibah-the-20th-anniversary-bridal-collection-photographed-by-damien-lovegrove/
[I really love to read your thoughts on these points.
[What I missed from a title that says “Hollywood Portraits Remastered” is a bit of an introduction/description, what defines a Hollywood Portrait-Look. Something like hard light sources, deep shadows, no or minimal fill. The main light sources being the key and the backlight. Styling of the 40s and 50s, Makeup etc.
Nevertheless I enjoyed watching the videos and the information you give about how to position the lights and how to invoke emotion, atmosphere and texture with them. The results are spectacular like all of your images.]
Thank you very much for your kind words. I hope my insights prove useful in your photography. Stay inspired. Damien.
These pictures are so great. I love your control of the shadows Damien and your creativity.
Thank you David. Your kind words are appreciated :)
Hello Damien,
thank you very much for the clarifications and further explanations. I will go through your videos. And come back, if I have more questions.
Have a nice weekend.
Mirko
Hi Mirko again,
Let me explain pictures 1 and 2 above. Shot one shows two lamps with 40w bulbs in. These are the motivation for the key and backlight on Helen. The key is an Arri 300 w at fader 7 (half power) and the back light is a Lowel iD light (100w) at about half power too. The resulting look is sublime and completely believable. It was easy to rig and what you see is what you get. No faffing around with light meters or colour temperature shifts etc. The shots look great in colour too by the way. I’d say that these shots are near impossible to light with flash. If you want more light I’d suggest putting 100w bulbs in the wall lights and use an Arri 650 as a key and an Arri 300 as a backlight. You’ll get about 5 minutes before the lampshades burn ;) If you get the video I explain all this and much more about selecting the right light, rigging and the setting of the lights to create believable beauty.
Cheers, Damien :)
Damien,
thanks for your reply. That clarified a few things and brought up some more questions. My flash-lights have a 250W modeling lamp, which is a bulb (so a point-light). The Arri Junior has 300W. The difference is not that big, or is it? My flash is 300W and can be adjusted by 6 Stops. So, if I’m not mistaken, I can use the modeling lamp at full power to evaluate the scene, see how the light falls and to focus. The fresnel-lightshaper has barn doors, so I could adjust them and get visual feedback with the modeling light as well. So if I use all this to set up my scene, there is only the flash-power to be adjusted, to get the right amount of light, like with every photoshoot with flash. The only thing I can not change is the shape of the flash-tube. So, it can be done with Flash (although not as comfortable as with high power HMIs)?
I read through your archives today and saw a post from febr 2010, where you featured an image that you have taken with a fresnel-lightshaper from broncolor. Underneath you wrote: “I brought out the Fresnel head on my Broncolor Mobil kit to light this exquisite shot. The transition from lit to unlit area is just perfect. It puts honeycomb grids and snoots into the shade.” Do you still agree with this?
I know that big HMIs are far better than flash for shots with a cinematic or theatrical look, but a 1K or 2K Arri sets you back a couple of hundred euros/pounds., whereas the fresnel-lightshaper is only 260 Euros. I’m trying to get it from the vendor for a test.
Mirko
Hi Mirko,
You are jumping to assumptions. First off the filament in an Arri 300 is a ‘W’ wind and about 10mm across. What diameter is your modelling light? I bet the flash is a big ring around that too. Let’s say the flash is a small 75mm diameter that’s a whopping 7.5 times th diameter of the Arri bulb. Hardly a point source.
The Bron Mobil head was a 75mm diameter light tube with a 50 degree reflector built in. They claimed 60 degrees but I think it was more like 50. The Fresnel adapter came with a frosted glass for the flash head and an inbuilt 20mm aperture behind the lens. The frosted glass created an even light source and the aperture made it small enough to focus with the Fresnel lens. It had an identical lens to the Arri 300 and worked in just the same way. I had to guess the shot and then look at the image on the camera, make adjustments and start again. The big problems were the lack of a decent moddeling light and no barn doors. I had a round spot of light to work with and that was it. No way of shaping it. The transition between th lit and unlit bit was fabulously smooth and there is no way to achieve that look with any other modifier especially grids.
The other big problem with flash is it is the wrong colour for evening interiors. Not only do you have 4 – 9 stops too much light but it is bright blue when your wall lights, candles, chandeliers and fireplaces etc are orange. Nearly all my shots in the post above that were taken in a ‘night’ setting with bedside lights or fireplaces etc had 300w and 100w tungsten lights dimmed down so as not to over power the ambient feel. Any flash in that space would kill the feel altogether.
So it’s a cace of use cinematic lights for that filmic/ movie look and use flash for the modern fashion look. Flash is great inside a softbox or bounced off a wall but no flash systems are designed as spotlights. Only spotlights modified to take flash. The flash is never a 10mm light source so the systems are compromises at best.
I hope this helps.
Damien.
Fantastic work, like always from you :-)
Thank you Iori :)
I really like the first two portraits, the high key is ok, but I much prefer that classic look you got in the first two. All series is outstanding, but then we expect that from you. :-) Great work and really shows your talent.
Thanks Alan :)
Hello Damien,
thanks for this Post and your training video (which I will be buying in the next minutes). I have a few questions though, if you don’t mind:
1) What do you think of the Fresnel-Light-Shapers, that are available for Flash-Units. I come from a film Background and know what Arri-Lights can do, but for photography I would like to use flash. I would like to implement film noir elements into contemporary fashion, portrait and boudoir photography (like a more contemporary Version of Hurrells Pictures or like the pictures of Vincent Peters). So low ISO and “crispness” (I don’t want to say sharpness) is what I strive for, together with distinct shadows and edgy directional light. Now I ask myself if I should invest in a Fresnel-Modifier (with Barndoors and all that stuff) or if grided Reflektors/Beauty Dish will do “the trick”.
2) In some of your posts (not this one) you mentioned the use of the Tiffen Black Pro Mist Filter. Is this something you would add into the Hollywood/Film Noir look. Is there something I can do to get a soft look but keep a high crispness in the picture?
Thanks
Mirko
Hi Mirko,
Well persevered with the WordPress algorithms. Now that you are approved you should have no further issues.
Thank you for your comments and custom:)
Answers:
1) Ive used Bowens and Broncolor fresnel adapters. They sort of work but the modelling lights don’t or they don’t represent the shots you end up with. Focussing is an issue too as you have to have to have room lights on to focus. With a 1kw equivalent continuous light you get at least 3 stops more light to focus with. Having said all that you can get a similar look with trial and error. Barn doors are the big issue though. Setting them needs real time feedback. A Fresnel light without barn doors is not worth the bother. The Bron Fresnel unit is 5 times the price of a continuous light. But that’s another story. If you are prepared to work at f/1.4 you can also work at ISO 200. Vincent Peters and co use practical lights in shot and set the exposure accordingly. Flash on lowest power would be 4 stops too bright. If you want the movie film look it has to be continuous. 575w HMI, 1.2k HMI are the tools of the lighting grips on movie shoots. I’m using lower power stuff here at ISO 800 with a kit lens on a mirrorless camera because it is all affordable kit and I love the look. If this was shot on Phase One on a tripod at ISO 200 using a set of primes the shots would get to Vincent Peters grade without flash. A flash tube is a doughnut. It cant be focussed like a point light source. What you get with aperture and ISO you loose in light quality. Grided reflectors leave a patternation that is just not beautiful and you cant scatter/ gobo the light in quite the same way.
2) Yes, I use the Tiffen black pro mist filters for all these shots as you will see in the movie. It doesn’t affect sharpness it only scatters highlights just like on film where there is halation from highlight reflections off the base layer. The base or anti halation layer on film is the dark coating that gets stripped off in the processing to leave a translucent film. It’s gorgeous and can’t be replicated in post production. Softars and other diffusers ‘soften’ images but the Pro Mists maintain absolute sharpness.
I hope this helps,
Regards, Damien.
Fantastic shots. Great use of light.
Compliments.
Paolo
Thanks Paolo :)
Damien, wonderful pictures as always.
I have a question for you though. I’m tearing out my hair trying to decide whether to buy an x100s or xPro1.
The pros as I see it for the x100s are the leaf shutter/high sync speed benefit and the built in ND filter, along with the size and simplicity of a fixed lens. The fixed focal length is also my major doubt about that camera. It won’t allow tight portraits and I know I’ll want it to.
Although more expensive, I wonder if the XPro1 with 18-55mm zoom would be a compromise. Is that lens on a par with the xf prime lenses or 23mm on the x100s?
If you could choose just one of those cameras, which would it be? Bearing in mind that I don’t intend to fork out for all the prime xf lenses.
Best wishes,
John Cooper.
John, It’s a dilemma,
1) Do you really need an optical viewfinder? I don’t so an X-E1 would be best for me. (LCD a bit smaller though)
2) The 18-55 zoom is as good if not better at all focal lengths than the 23mm f/2 on the X100s but it’s f/2.8-f/4
3) An X-E1 and a 23mm f/1.4 (due out in October) is the best of both
4) The high speed sync is not that big a deal with W/A lens. No bokeh to chase
5) The inbuilt ND of the x100 is useful in sunlight to keep the apertures sensible. But a screw on ND is fairly easy and cheap
6) The X100s will make you feel alive because the way you will take pictures and see the world is different
7) The X100s can do reasonably tight head and shoulder shots with care but it excels at waist length portrait and wider
8) If you get the X100s you keep the SLR kit and use both regularly
9) If you get the X-Pro1 or X-E1 your SLR will gather dust but you will occasionally miss that extra detail ff D800 or 5D3 gets you
10) You choose
I hope this helps :)
Damien.
Fabulous once again Damien
I now have the Fuji XPro1 and a set of lenses.
If I could do work like yours I would be so proud
Hi Mark,
Thank you. I’d just like to suggest you need to get out there. Time taking pictures is the catalyst to achieving great work. Study your technique, get inspiration and get out there. I wish you lots of great moments with your camera. Visit often,
Stay inspired. Damien.